


Enhance your screenshots or images with easy editing tools. You can use text, arrows, shapes, highlights, and more in the Image Editor. It’s designed to give you a richer experience to share and communicate with your team. This versatile photo editing tool empowers users to enhance and customize their photos with features such as filters, text overlays, adding multiple images, scrolling screenshots, blur, text recognition, and precise image cropping, allowing for seamless and creative transformations.
How-to-use the image editor
After you have taken a screenshot, a quick notifications menu appears providing you with several options. To edit your screenshot, choose the edit option in the notification menu.
The image editor will appear with your screenshot. When opened you’ll notice a similar design to our easy video editor.
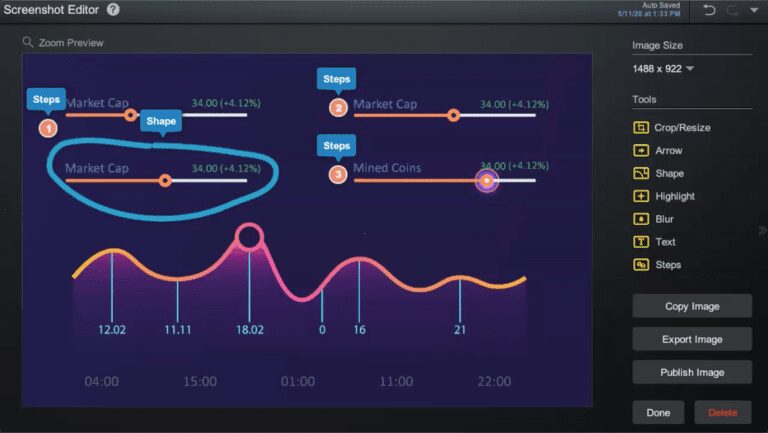
All the tools you need are located on the right-hand side of the image editor.

Image editor tools
You can edit any image saved in your screenshots folder. The photo editor includes the following editing options:
Under Image Size, you can adjust the size of your image. Just type in the desired size and hit okay.
![]() Crop/Resize
Crop/Resize
Drag the crop handles to select the portion of the screenshot you want to keep. Click “Done” to complete the crop. The screenshot editor can also resize your screengrabs.
![]() Arrow
Arrow
Quickly point to an area of your image with arrows. You can customize the style of your arrow and choose how it starts and ends. You can also customize your arrow with color or shadow.
Freehand
Draw anywhere on the image using your cursor with the ability to customize the line color and shadow.
![]() Shape
Shape
You can choose from a variety of different shapes including basic shapes, block arrows, equation symbols, and lines. You can also choose to draw freehand to point something out in your screengrab.
Image
Add unlimited images from your computer files, clipboard, ScreenPal’s project manager, or our stock library (with a paid plan).
![]() Blur
Blur
Adding a Blur is a great way to hide personal information including email addresses or contact info. You control the size and opacity of the blur.
![]()
Steps
You can add steps or numbers on your screenshot. Showcase ideas clearly with numbered steps so your audience can easily follow your thoughts or ideas.
![]()
Text
Rich text is another great feature to add to any image. You can easily add your thoughts or titles to images. You can personalize your text with color, font style, and size. Effortlessly add text to photos for enhanced visual content.
![]() Highlight
Highlight
A highlight allows you to focus on a specific area of your image.
Text recognition
Easily capture text from a screenshot or image and turn it into an editable field with our text recognition feature.
Copy, export and publish your images
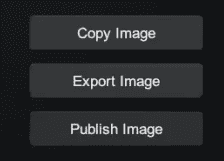 ScreenPal has provided several ways for you to share and publish your image.
By clicking on ‘Copy Image,’ you are able to save it to your clipboard.
‘Export Image’ allows you to save your image as a P-N-G file on your computer. (TIP: You can also convert any image to a PNG file!)
You can also publish your screenshot to your ScreenPal account. This allows you to grab a link of your screenshot to share with your audience.
You can also control who sees your image. Choose your visibility settings and click on publish.
Add screenshot images to your video project
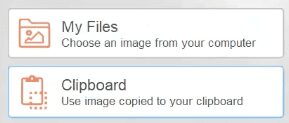 There are so many things you can do with your screenshot. You can add your screenshots or images to any video project.
Open the video editor and choose the ‘Overlay Image’ option.
If you copied your screenshot to your clipboard, all you need to do is click on ‘clipboard’ to add to your video.
If you saved it as a .png file, you can upload the screenshot from your files and add it to your video project.
Screenshot resources
Screenshots are a visual way to communicate and collaborate with the team. With annotations, you never have to worry about communicating a confusing message. You can make it clear with this easy tool.
Here is more information you can access:
An overview of the screenshot tool
Effectively communicate and collaborate with the screenshot tool


