Main Menu
You open your screen recorder, hit Record, and begin explaining. Thirty seconds later, you stumble over the introduction. Start again. This time the opening works, but halfway through the recording you realize you forgot an important point. On the next attempt, you remember the point but struggle to coordinate what you’re saying with what’s happening on screen. Suddenly, a five-minute training video has taken an hour to create. If that sounds familiar, Connie Malamed has a message for you: video scripting makes recording easier.
During her ScreenPal Innovative Learning Summit session, “Crash Course in Writing Video Scripts,” Connie Malamed, author, instructional design expert, and creator of The eLearning Coach, broke down a practical process for turning learning objectives into clear, engaging instructional video scripts.
Her session moved beyond simply asking, What should I say?
Instead, Connie encouraged learning professionals to think about the entire experience:
What does the learner need to see? What do they need to hear? What should capture their attention? How should the information be structured? And, most importantly, what should they be able to do when the video ends?
The answer begins long before you press Record.
Jump to a takeaway
- Start by deciding whether video scripting is the right approach
- Video scripting starts before the writing
- Use AI as a collaborator in your video scripting process
- Before video scripting, write a treatment
- Know the rules, and the resources, before you write
- Plan your video scripting around B-roll
- Build your script around three essential parts
- Hook learners by answering, “Why should I care?”
- Use video scripting to show, not just tell
- Break the content into digestible pieces
- Give the learner a challenge to recognize
- Don’t let the video end with the summary
- Make the CTA part of the learning design
- Use video scripting to coordinate what learners see and hear
- Write narration for the ears, not the eyes
- Let the visuals and narration complement each other
- Keep the language concise, active, and conversational
- Before you record, run one final video scripting quality check
- Better video scripting starts before the camera turns on
Start by deciding whether video scripting is the right approach
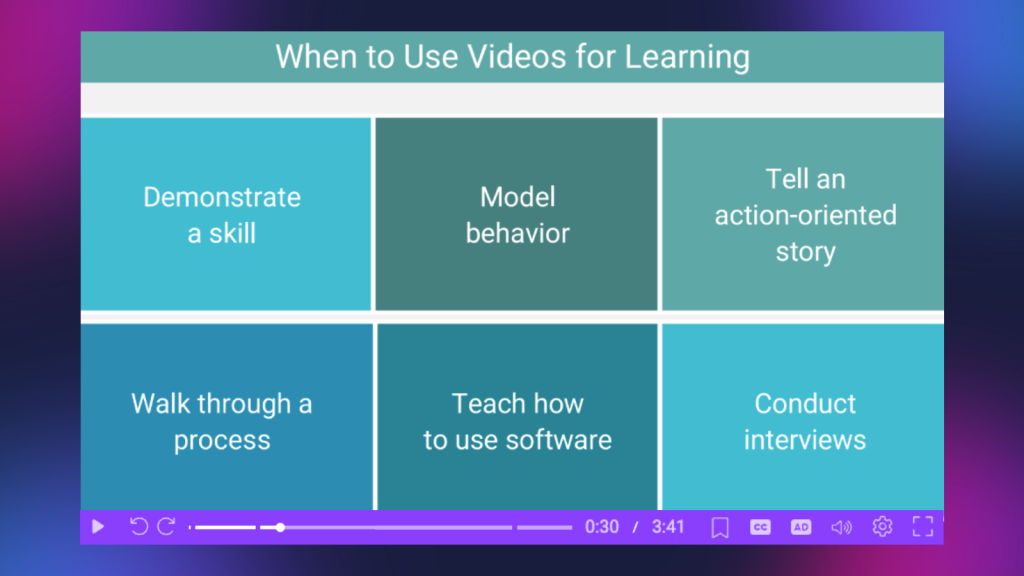
Not every learning problem needs a video. Before getting into scripting techniques, Connie stepped back to ask a more fundamental question: When is video actually the right medium for learning? Video is particularly useful when learners benefit from seeing something happen.
That might include:
- Demonstrating a skill
- Modeling a behavior
- Telling an action-oriented story
- Walking learners through a process
- Teaching someone how to use software
- Conducting or sharing an interview
Think about a software tutorial. Written instructions might tell a learner which menu to open and which button to select, but video can show the entire sequence as it happens.
The same principle applies to behavioral training. If you’re teaching managers how to respond to a difficult employee conversation, a video scenario can demonstrate tone, facial expressions, body language, timing, and word choice in ways a paragraph cannot.
That ability to combine visual and auditory information is one of video’s greatest strengths.
Connie discussed dual coding theory, which proposes that people process information through visual and verbal channels. When those channels are used thoughtfully, video can give learners multiple ways to process new information.
But there is an important qualifier: the video has to be designed well. A video that moves too quickly can increase cognitive load instead of reducing it. Too much information, rapidly changing visuals, or dense narration can overwhelm learners.
Video can also introduce technology and bandwidth barriers, offer limited interactivity depending on the platform, and require more production time than another format.
The question shouldn’t be, “Can we make a video about this?”
It should be: “Will seeing and hearing this make it easier to learn?”
Video scripting starts before the writing
One of Connie’s strongest themes was preparation. Experienced video creators know how tempting it can be to start writing, or recording, as soon as a project arrives. But many of the problems that appear during production can be traced back to decisions that weren’t made beforehand.
Connie outlined a five-part scripting process: Analyze → Ideate → Prepare → Write → Edit and refine
During analysis, identify the audience, performance objectives, learning context, and other characteristics that will shape the experience.
Then explore creative possibilities. What kind of video would communicate the idea effectively? Could you demonstrate the skill? Build a scenario? Follow a character? Record a process? Use a screen capture? Combine a presenter with B-roll? Only after those questions have been explored should you begin preparing the script itself.
That preparation makes scripting less about staring at an empty document and asking, What do I say? Instead, you’re writing from decisions you’ve already made.
Yes. I’d weave ScreenPal in as a practical example of Connie’s philosophy rather than making the section suddenly feel product-focused. Here’s a revised version:
Use AI as a collaborator in your video scripting process
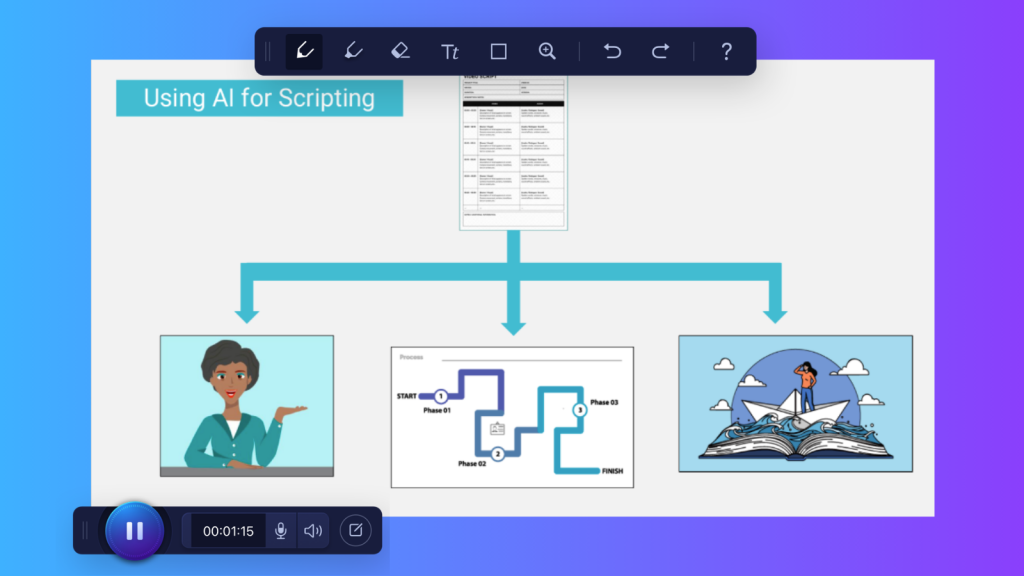
AI naturally came up during Connie’s discussion of scripting. After all, generative AI can create a video script in seconds. But Connie encouraged attendees not to hand over the creative process quite so quickly.
Your script communicates your unique vision. No one else explains an idea, describes a process, or tells a story in exactly the same way you do. For that reason, Connie recommended continuing to develop your own writing skills and doing the thinking and planning first, then using AI as a collaborator.
That doesn’t mean avoiding AI. In fact, Connie identified useful opportunities for AI throughout the scripting process.
During analysis, AI can help:
- Generate potential survey questions
- Surface common beginner misunderstandings
- Explore audience needs
During ideation, it can:
- Brainstorm creative approaches
- React to your ideas
- Suggest possibilities you haven’t considered
During preparation, AI can critique a treatment for clarity or help determine whether the proposed approach aligns with the video’s objectives.
Once you’ve developed your ideas, AI can also help turn them into a more polished script. ScreenPal’s AI script generator, for example, lets you start with your own voice and expertise rather than asking AI to invent the lesson for you. You can plan what you want to communicate, enter detailed notes and instructions, and give AI the context it needs to understand your intended message. ScreenPal can then use those inputs to bring the pieces together into a polished video.
This creates a workflow that closely reflects Connie’s approach: you provide the ideas, expertise, point of view, and direction; AI helps shape and refine them. Instead of beginning with a generic AI-generated script and trying to make it sound like you afterward, you can begin with what you want to say and use AI to make the scripting process faster.
AI can continue supporting the process as you refine the draft by identifying unclear sections, pointing out potential gaps, suggesting visuals when you’re stuck, or helping tighten the wording.
And during the final quality check, AI can help:
- Reduce a script to a target length
- Check reading level
- Identify unnecessary jargon
- Proofread the final copy
The distinction is important. AI can help you improve and organize the thinking. It doesn’t have to replace the thinking.
Connie described AI as the collaborator rather than the originator of the idea. With tools like ScreenPal’s AI script generator, creators can put that philosophy into practice: start with their own knowledge, ideas, and voice, then let AI help transform that foundation into a polished script that’s ready for video.
I especially like the “you provide the ideas, expertise, point of view, and direction; AI helps shape and refine them” framing because it connects the ScreenPal feature directly to Connie’s message instead of feeling like an inserted product pitch.
Before video scripting, write a treatment
Imagine spending hours writing a complete script. You send it to a stakeholder or subject matter expert. They return it covered in comments because they imagined an entirely different video.
Connie has experienced versions of that problem, which is why she recommended creating a video treatment before writing the complete script.
A treatment is a short written summary that communicates your vision for the video to stakeholders, clients, or production teams. It doesn’t need to be elaborate, in fact, Connie suggested it might be only a page or two. The goal is alignment.
Before investing the time required to script every line of narration and every visual moment, give reviewers enough information to understand what you’re planning:
- What kind of video is this?
- What story or structure will it follow?
- What style will it use?
- What should the experience feel like?
Getting feedback at this stage is significantly easier than discovering a fundamental disagreement after the complete script has been written.
In other words, review the idea before reviewing every word.
Know the rules, and the resources, before you write
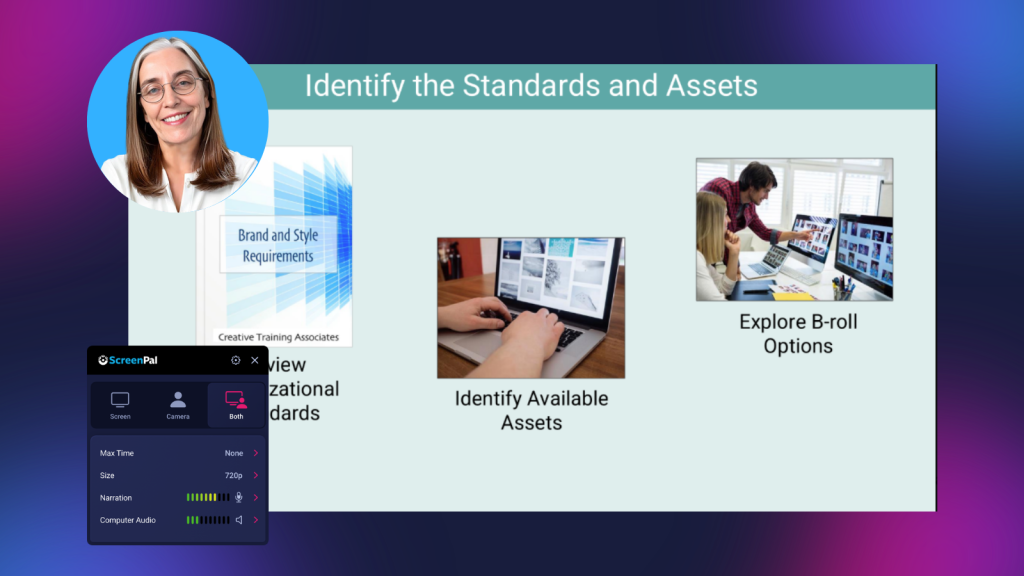
Preparation also means understanding the environment where the video will be produced. Connie recommended reviewing organizational writing and style standards before scripting.
Those standards might define:
- Tone
- Use of contractions
- Pronouns
- Terminology
- Product or service names
- Other language conventions
For consultants and instructional designers working across organizations, those details can vary significantly from client to client.
Next, identify the assets already available to you. Your learning team may already have images or recordings. Marketing may have access to stock photography, stock video, graphics, brand assets, or previously recorded footage.
Knowing what exists changes what you can realistically write. It can also save time and money later.
Plan your video scripting around B-roll
One particularly useful part of Connie’s preparation process was exploring B-roll before production.
Your primary footage is typically considered A-roll. B-roll is supplementary footage that can be inserted to support what the audience is hearing. If a presenter spends five minutes describing a workplace process directly to the camera, the audience sees essentially the same visual for five minutes.
Instead, you might cut to:
- The process being performed
- A close-up of a relevant object
- Someone using the software
- A workplace interaction
- An example document
- An environmental shot
- Supporting graphics or animation
B-roll doesn’t simply make the video prettier. It lets you take advantage of what makes video valuable in the first place: the ability to show what you’re talking about.
Of course, knowing that you need B-roll and actually finding the right footage are two different things. Searching the web for appropriate images or videos can quickly add time to a project; and introduce questions about licensing and whether you’re actually allowed to use what you’ve found.
ScreenPal helps simplify that part of the production process with a built-in stock library of images, video clips, and audio. Instead of struggling to track down appropriate, free-to-use media from multiple sources, creators can search for stock assets within ScreenPal and incorporate them into their videos. That makes it easier to plan B-roll alongside the script and add visual variety without having to record every supporting shot yourself.
It can also change the way you approach scripting. If you know relevant stock footage is readily available, you can intentionally plan moments where the learner sees an example, environment, action, or visual detail while the narration provides additional context. In other words, B-roll becomes part of the learning design rather than something you scramble to add after the recording is finished.
For videos filmed on location, Connie also recommended thinking through practical production questions early. Do you have permission to film? Is there enough physical space? Will the location be noisy? Could weather affect an outdoor shoot? Can an existing set be changed?
These may sound like production questions rather than writing questions, but that’s precisely Connie’s point. Production decisions affect what you can write—and knowing which resources you have available can help you write a script that’s both more visual and more realistic to produce.
Build your script around three essential parts
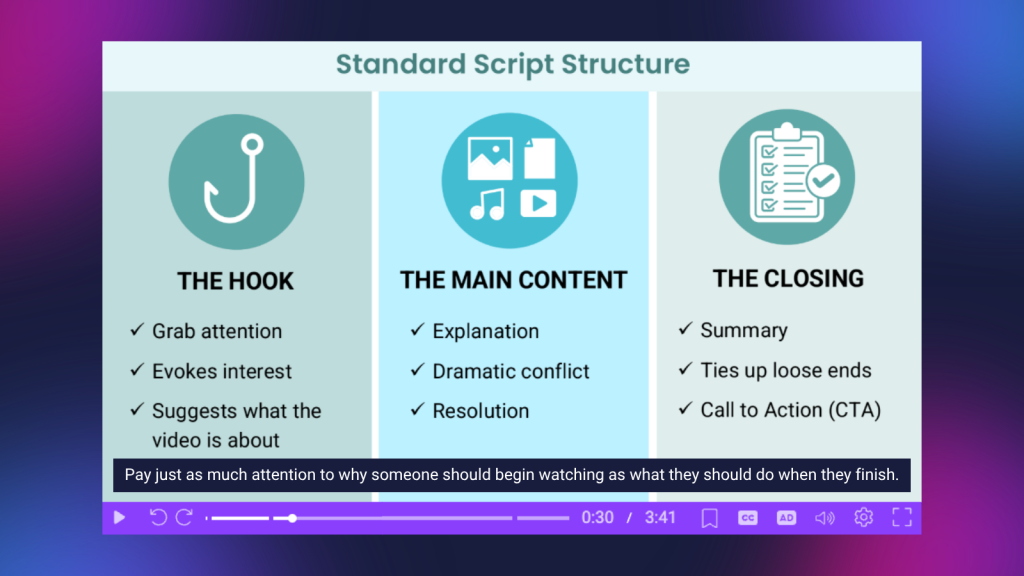
Once the preparation is complete, Connie recommended a familiar three-part structure: Hook → Main content → Closing
It’s simple, but each part has a distinct instructional job. The hook earns attention, the main content explains, demonstrates, or tells the story; and the closing reinforces what matters and gives the learner somewhere to go next.
For instructional designers accustomed to organizing content around objectives and information, the first and third sections can be especially easy to overlook.
We often concentrate on getting the content right.
Connie encouraged attendees to pay just as much attention to why someone should begin watching and what they should do when they finish.
Your hook should answer: “Why should I care?”
A good instructional video doesn’t need to begin with a formal list of learning objectives. It does need to quickly help the viewer understand why the next few minutes are worth their attention.
Connie connected this to the familiar instructional design question: What’s in it for me?
A hook can take several forms, including:
- Start with a problem: Ever wonder why your course isn’t engaging learners? A relevant problem creates immediate recognition.
- Share a surprising fact: An unexpected statistic can create curiosity; provided, of course, that the statistic is accurate and relevant.
- Begin with a short story: Introduce a character facing a situation the learner recognizes. A safety video, for example, could begin with a worker who ignored an important precaution and immediately experienced the consequences.
- Promise a useful benefit: Tell the learner exactly what they’ll be able to accomplish: Want to make your videos accessible? In this quick tutorial, you’ll learn how to add closed captions in under two minutes.
The format of the hook can change, but the purpose of the hook does not. Give your learners a reason to continue.
Use video scripting to show, not just tell
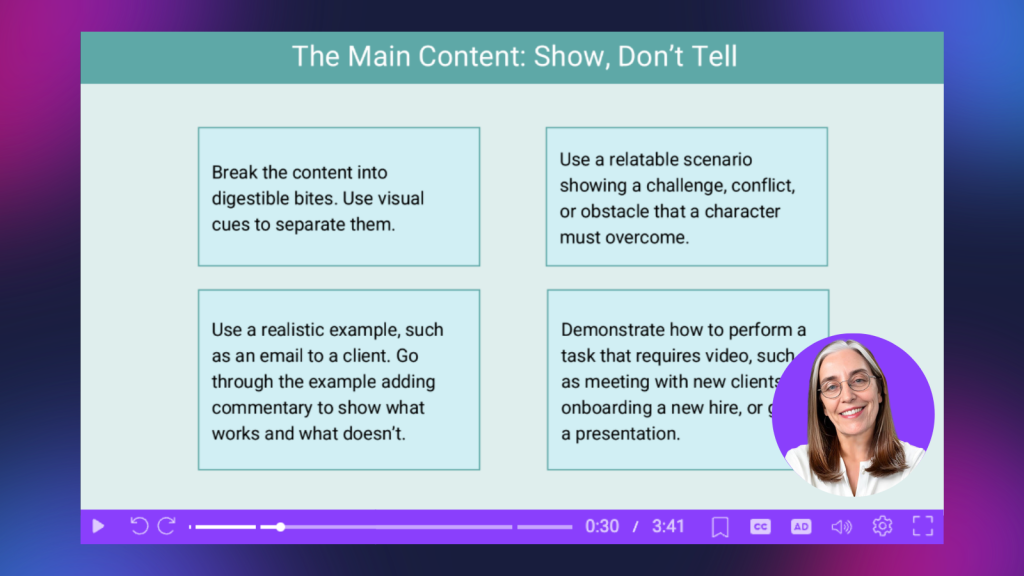
Once you’ve earned the learner’s attention, the main content needs to deliver. Connie’s central rule for this part of the script was familiar but especially important for video: Show, don’t tell.
Most of us learned to write for reading. Essays, reports, emails, articles, and documentation depend heavily on words to communicate information.
Video requires a different mindset. You are no longer writing only what someone will hear. You are deciding what they should see while they hear it.
If you’re teaching someone how to use software, show the software; if you’re teaching a workplace behavior, show the behavior. If you’re analyzing a client email, put the email on screen and walk through the parts that work and the parts that don’t. If you’re teaching presentation skills, demonstrate the gestures and positions rather than simply describing them.
And if you’re using characters in a scenario, don’t narrate every emotion. Let the audience see frustration, hesitation, confidence, or uncertainty through behavior when possible. The visual channel should be doing real instructional work.
Break the content into digestible pieces
Even a well-written explanation can become overwhelming when too much information arrives at once. Connie reminded attendees that working memory is limited. Learners need time to process what they’re seeing and hearing.
One solution is chunking. Break the main content into smaller sections and use clear visual cues to distinguish them.
A video teaching six presentation techniques, for example, can visibly transition from technique one to technique two rather than presenting the entire lesson as one continuous stream.
The learner gains a mental structure: Here’s one idea. Now here’s the next.
Those divisions also make content easier to navigate and revisit, and AI can help with some of that organization. ScreenPal’s AI can automatically analyze your video and organize the content into digestible sections called Chapters, identifying natural topic changes so viewers can quickly navigate to the information that’s most relevant to them. Instead of manually identifying and labeling every section, creators can use AI to create that structure automatically and then refine it as needed.
For longer learning videos, Chapters can be particularly valuable. A learner who needs to review one concept doesn’t have to rewatch the entire recording or scrub through the timeline looking for the right moment. They can jump directly to the section they need, reinforcing Connie’s larger point that chunking isn’t just about how information is presented the first time, it’s also about making that information easier to process, navigate, and revisit later.
For more complex material, the video may need additional support. A job aid, downloadable resource, transcript, slides, or other reference can help learners return to important information without expecting them to remember everything after one viewing.
The goal isn’t simply to make a short video. It’s to structure and pace information in a way people can actually process, and make it easy for them to return to what they need later.
Give the learner a challenge to recognize
Scenarios are another way to make the main content more useful. Rather than describing an abstract principle, show a realistic problem that mirrors something the audience encounters. A character can face a challenge, conflict, or obstacle and demonstrate how to respond.
You might show:
- A manager handling a difficult conversation
- A customer service employee responding to an upset customer
- A new employee navigating an unfamiliar process
- Someone making, and correcting, a common software mistake
- A presenter demonstrating effective and ineffective body language
The scenario works when learners recognize something from their own world.
The question becomes less, Do I remember this information? And more, What would I do here?
Don’t let the video end with the summary
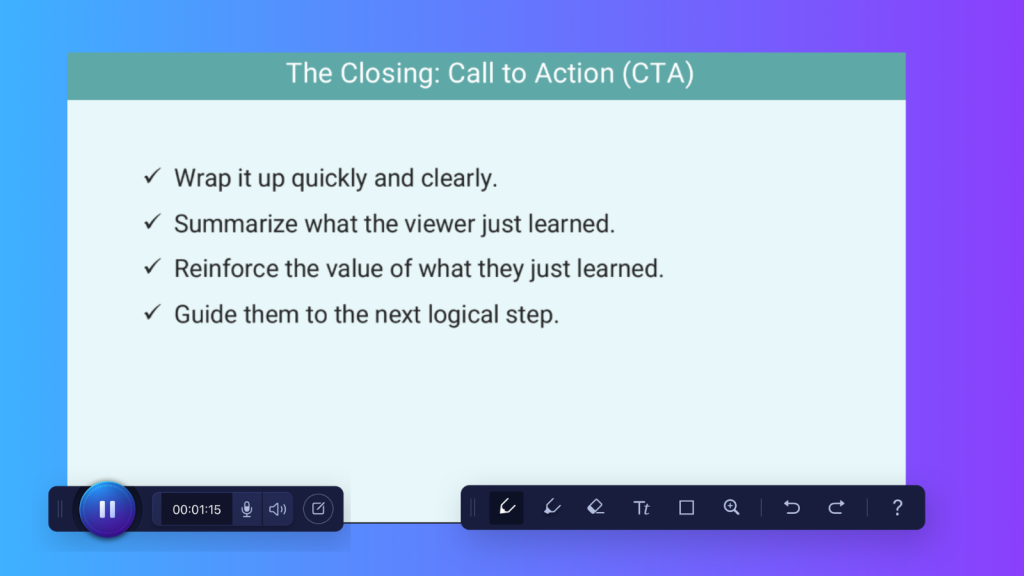
Training videos are often good at summarizing. We tell viewers what they learned, revisit the important points, and bring the lesson to a tidy close. But Connie highlighted something instructional videos often borrow less successfully from other forms of communication: the call to action.
In marketing, a CTA might ask someone to purchase a product, schedule a demo, or sign up for something.
In learning, the CTA has a different job.
It answers: What should the learner do with this information now?
Connie shared several examples:
- After phishing training: Check your inbox. Can you spot any potential phishing emails?
- After workplace safety training: Walk through your work area today and identify three potential hazards you hadn’t noticed before. Share them with your team.
- After customer service training: During your next customer interaction, use the empathy technique we just covered. Then notice whether the customer’s response changes.
- After training about bias: Pause and reflect. When have you witnessed bias at work, spoken or unspoken? What was your response, and what could you do differently now?
These CTAs work because they’re immediate and practical. They move the learner from knowing to doing. And that may be the most important transition in the entire video.
Make the CTA part of the learning design
Attendees quickly recognized the value of Connie’s CTA examples. They described them as actionable, useful, memorable, and something learners could try immediately.
That’s an important distinction. The CTA isn’t simply a clever way to finish the script—it can become the bridge between the video and actual performance.
Instead of ending with: Thanks for watching.
Ask: What could this person realistically do next?
That could mean practicing a skill, looking for an example, reflecting on an experience, trying a technique, completing a task, discussing something with a colleague, or applying the idea during their next real-world opportunity.
You can also build that next step directly into the video experience. ScreenPal’s Call-to-Action and annotation buttons let you give learners clickable pathways to whatever should come next. Rather than simply telling viewers to visit another resource, you can direct them there from the video itself.
For example, a button could send learners to:
- A job aid or downloadable resource
- A form or survey they need to complete
- The next video or lesson in a learning sequence
- A related article, website, or reference
- A practice activity or assignment
- Additional training or support materials
That turns Connie’s idea of the CTA into something learners can act on immediately. If the goal is for someone to download a checklist and use it during their next task, don’t just mention the checklist, give them a button that takes them directly to it. If learners need to complete a reflection or feedback form, provide the link while that next step is still fresh in their minds.
And the CTA doesn’t necessarily need to wait until the final seconds of the video. Annotation buttons can provide relevant resources at the moment they’re most useful, giving learners opportunities to explore supporting information without cluttering the core instruction.
If you’re stuck on what that next action should be, this is another place where Connie suggested AI can help. Give AI your script and ask it to brainstorm realistic ways learners could apply the content immediately.
Then use your knowledge of the audience and the performance objective to decide which action actually makes sense; and, when possible, make that next step easy for the learner to take.
Use video scripting to coordinate what learners see and hear
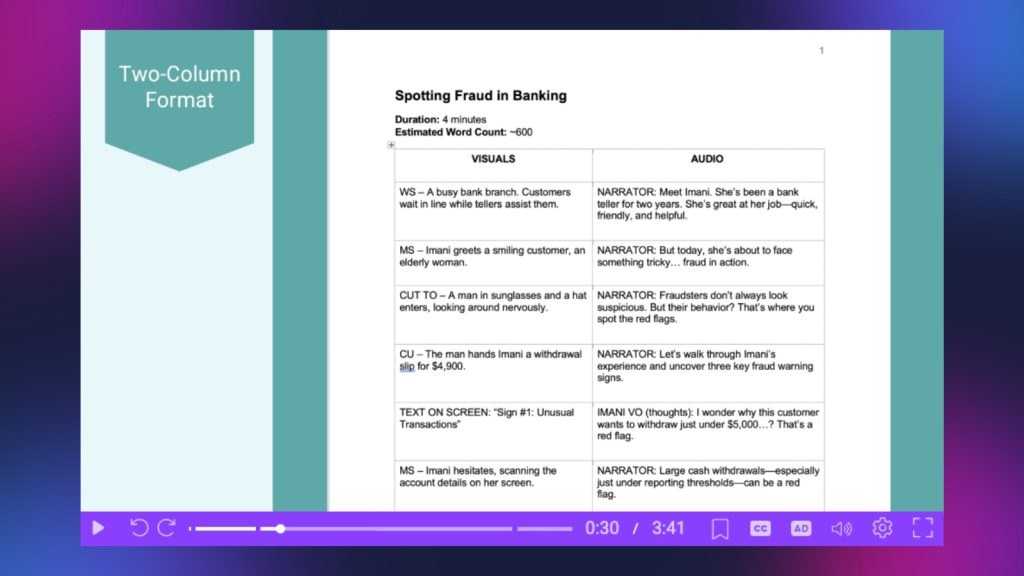
A video script isn’t simply narration. It is a production document that coordinates visual and auditory information. Connie shared several common ways to organize that information.
The two-column script
One column contains everything visual, and might include:
- Camera shots
- On-screen text
- Screen recordings
- Graphics
- B-roll
- Transitions
- Visual actions
The second column contains audio:
- Narration
- Dialogue
- Voiceover
- Sound
- Even a character’s internal thoughts
This format makes it easier to see how the visual and auditory pieces work together.
Add production notes
A third column can include technical details such as timing, transitions, special effects, or other instructions needed by the production team. Common shorthand might include VO for voiceover and SFX for special effects.
Use a storyboard
For highly visual content, a storyboard can be even more useful, and you don’t need to be an illustrator. Rough shapes and stick figures are enough. The goal is not beautiful artwork; the goal is to answer: What will the learner see at this moment.
Write narration for the ears, not the eyes
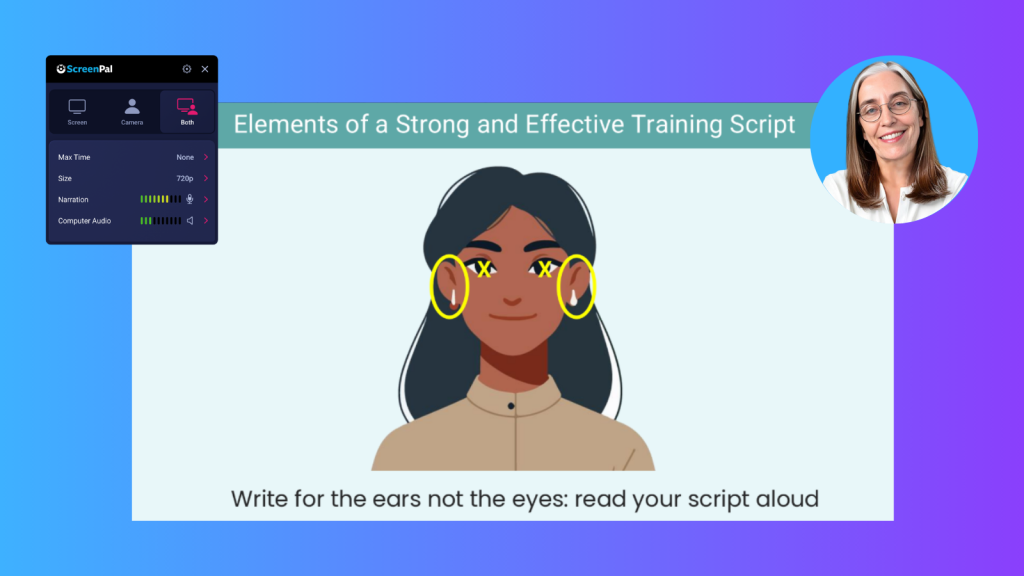
Writing spoken language is different from writing text meant to be read. Connie encouraged attendees to write narration for the ears. That means using language that sounds natural when spoken aloud.
A sentence can look perfectly acceptable on a page and still feel awkward when someone tries to say it. Long sentences become difficult to follow, complicated phrases become tongue twisters, and formal language can make the speaker sound distant.
The solution is wonderfully low-tech: Read the script aloud.
If you stumble over a sentence, rewrite it; if you run out of breath, shorten it. If it doesn’t sound like something a person would actually say, make it more conversational. Your narrator will thank you. More importantly, your learner will have an easier time following along.
Let the visuals and narration complement each other
Connie also warned against redundancy between what learners see and hear. If the narration simply reads every word displayed on screen, the two channels aren’t necessarily helping each other.
Instead, allow visuals and narration to contribute different but complementary information. Write the narration for the ears and the visuals for the eyes.
That might mean showing a software action while the narrator explains why it matters, or displaying a realistic example while the narration points out what learners should notice. It might include demonstrating body language while the speaker explains how it may affect an interaction.
The strongest video scripts aren’t just written documents with pictures attached later. They are designed from the beginning as an interaction between what the learner hears and what the learner sees.
Keep the language concise, active, and conversational
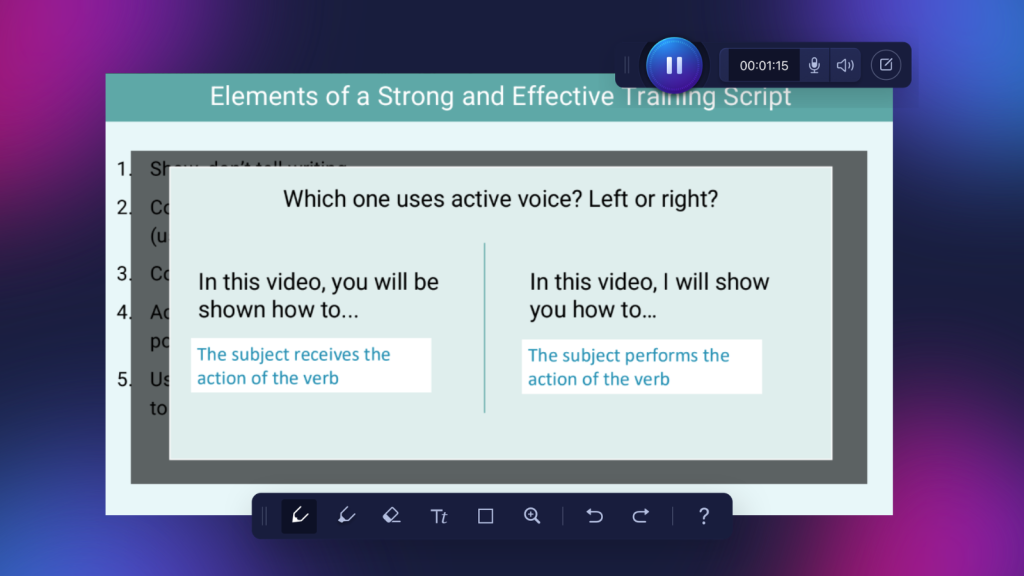
Connie’s final writing recommendations returned to the fundamentals.
Strong instructional video scripts should:
- Show rather than simply tell
- Use a conversational tone
- Make every word count
- Prefer active voice
- Incorporate stories and scenarios when appropriate
- Be easy to understand
- Use visual cues to segment information
- Maintain a consistent point of view
- Match the pacing to the audience and content
Point of view also matters. First person can work well for personal experiences and storytelling. Second person, you, is often effective for direct instruction. Third person can be useful when discussing external examples or scenarios. The exact choice depends on the context and tone, but consistency helps the experience feel intentional.
And when you’re uncertain about how something sounds, Connie offered another practical strategy: ask members of the audience. Even a few representative learners can tell you things about clarity and tone that the person closest to the project may miss.
Before you record, run one final video scripting quality check
Once the script feels finished, resist the temptation to immediately move into production.
Connie recommended one final review, during which you ask yourself:
- Does the script support the performance objectives? Every major part of the video should connect to what learners ultimately need to understand or do.
- Is the narration clear? Read it aloud. Look for unnecessary jargon, awkward sentences, and places where the language sounds written rather than spoken.
- Does the video have an effective hook, main section, and CTA? Make sure the structure carries the learner from attention to understanding to action.
- Do the visuals support the narration? Identify the screen recordings, B-roll, graphics, demonstrations, text, or other assets required.
- Are the production directions clear? Someone other than the writer should be able to understand what is supposed to happen.
- Has everyone who needs to review the script actually reviewed it? Few things are more frustrating than reaching the end of the scripting process only to discover another stakeholder needs to approve the content.
Identify reviewers early, align before production, and then press Record.
Better video scripting starts before the camera turns on
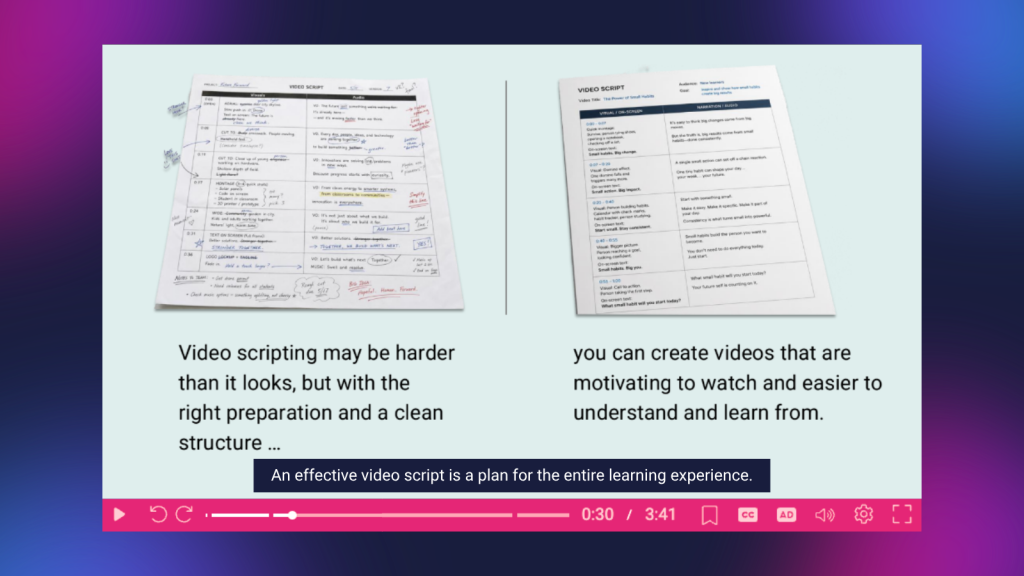
Connie closed her session by returning to the idea she introduced at the beginning: Video scripting is harder than it looks. But it becomes much more manageable when we stop treating the script as simply a page of narration.
An effective video script is a plan for the entire learning experience. It identifies what learners need, communicates the creative vision, coordinates what people see with what they hear, creates a reason to keep watching, and organizes information into manageable pieces.
An effective video script ends by helping learners do something with what they’ve learned. That planning doesn’t slow down video production. It can prevent the repeated takes, confusing visuals, missed information, stakeholder rewrites, and last-minute fixes that make production take longer in the first place.
So the next time you’re tempted to open your recorder and figure out what to say as you go, try starting somewhere else.
Analyze the learner. Define the objective. Explore the idea. Write the treatment. Plan the visuals. Build the hook. Script the content. Create the call to action. Read it aloud. Then record.
The camera may be where the video gets captured. But as Connie’s session demonstrated, the learning experience begins with the script.
About the speaker
Connie Malamed is an instructional design and learning experience design expert, author, and creator of The eLearning Coach, where she provides resources, articles, podcasts, and professional development for learning professionals.
She is the author of Visual Design Solutions and is known for translating principles from learning science, visual communication, instructional design, and cognitive psychology into practical strategies that learning professionals can apply to their work.
Through her writing, speaking, courses, and The eLearning Coach platform, Connie helps instructional designers and learning professionals create experiences that are clearer, more engaging, and grounded in how people learn.